Difference between revisions of "Simulator Composition"
(→Simulation setup and organisation) |
|||
| (40 intermediate revisions by the same user not shown) | |||
| Line 1: | Line 1: | ||
== Simulation setup and organisation == | == Simulation setup and organisation == | ||
| − | The | + | The starting point of a simulation is the [[Scenario_file | scenario file]]. Each simulation scenario is defined by such a file, which is basically a list of all properties and entities that make up a particular scenario. When the [[Scenario_Selector_GUI | Scenario Selector GUI]] is called, it scans all the available scenario files and gives a list with descriptions. The user can then select a scenario and start the simulation by clicking on Start Scenario. This calls the class SimulatorMain which takes care of the simulators graphical interface and calls clsMain to handle the non graphical simulator background. |
| + | |||
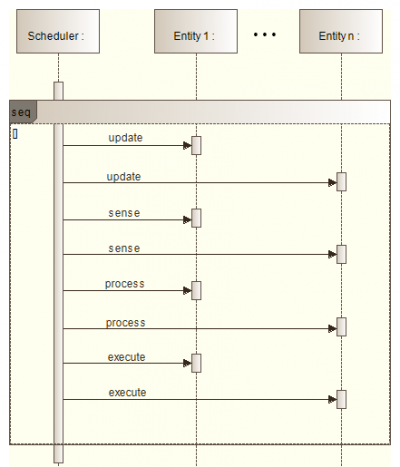
| + | SimulatorMain and clsMain both extend modules of the [http://cs.gmu.edu/~eclab/projects/mason/ MASON multiagent simulation toolkit] that provides the simulation framework. The central module that MASON supplies is the scheduler. Before starting the simulation, the scheduler invokes a start procedure in clsMain which is configured to call [[#clsSimplePropertyLoader|clsSimplePropertyLoader]] to manage the scenario setup (create all entities decision units etc. and apply properties according to the scenario file). Everytime a [[#Entities|entity]] is created, it is registered at the scheduler. Once the simulation is running, the scheduler calls 4 procedures (one after another for all registered objects) for each simulation step. The following diagram shows the principle | ||
| + | |||
| + | |||
| + | [[File:scheduler.png | 400px | center | thumb | Fig. 1: Scheduler principle]] | ||
| + | |||
| + | == clsSimplePropertyLoader == | ||
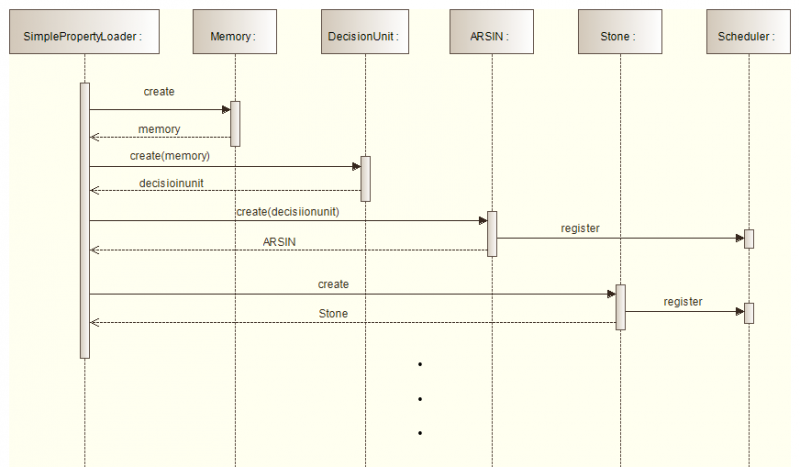
| + | This class sets up the simulation according to the selected scenario file. Most important, it manages the creation of the memory(s), decision unit(s) and [[#Entities|entities]]. This process happens in 3 steps. If the entity that is to be created is a ARSIN, than it creates a instance of the memory (clsSearchSpaceManager and clsLongTermMemoryHandler), otherwise this step is skipped. Then a decision unit (which one is defined by the scenario file) is created and for the case ARSIN the memory handlers are passed to the DU. Last the entity is created and if needed the DU is passed to it. When a entity is created, it is registered at the scheduler. The following diagram shows the simplified principle (in reality the creation and registration is performed via factories) | ||
| + | |||
| + | |||
| + | [[File:Clssimplepropertyloader.png | 800px | center | thumb | Fig. 2: SimplePropertyLoader]] | ||
== Entities == | == Entities == | ||
| + | The entities that are currently available in the ARS simulator are | ||
| + | |||
| + | |||
| + | <center> | ||
| + | {| border="1" cellpadding="10" cellspacing="0" | ||
| + | |clsApple | ||
| + | |clsAppleGreen | ||
| + | |clsBase | ||
| + | |clsCake | ||
| + | |clsCan | ||
| + | |- | ||
| + | |clsCarrot | ||
| + | |clsFungus | ||
| + | |clsFungusEater | ||
| + | |clsHare | ||
| + | |clsLamp | ||
| + | |- | ||
| + | |clsLynx | ||
| + | |clsPlant | ||
| + | |clsRectangleStationary | ||
| + | |clsRemoteBot | ||
| + | |clsRemoteBotOrientationTest | ||
| + | |- | ||
| + | |clsSchnitzel | ||
| + | |clsSchnitzl | ||
| + | |clsSelf | ||
| + | |clsSmartExcrement | ||
| + | |clsSprout | ||
| + | |- | ||
| + | |clsSpeech | ||
| + | |clsStone | ||
| + | |clsToilet | ||
| + | |clsTomato | ||
| + | |clsUnrealHealth | ||
| + | |- | ||
| + | |clsUraniumOre | ||
| + | |clsWallAxisAlign | ||
| + | |clsWallHorizontal | ||
| + | |clsWallVertical | ||
| + | | | ||
| + | |} | ||
| + | </center> | ||
| + | |||
| + | For further information see [[Entity_Hierarchy|Entity Hierarchy]]. In order to interact with the simulator and the other simulated objects, every entity has a [[#Body|body]] (implemented via a member clsBaseBody). | ||
=== Body === | === Body === | ||
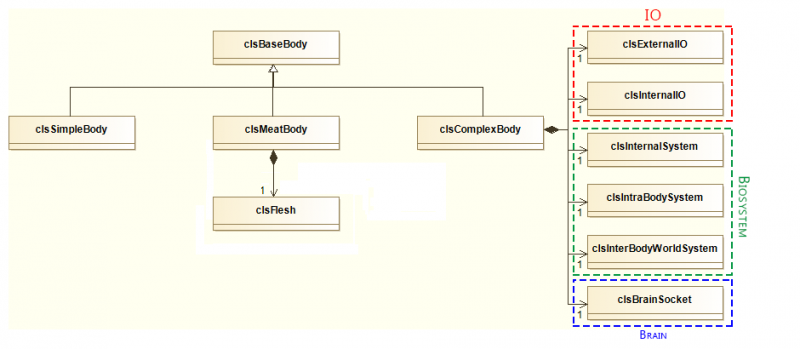
| + | There are three types of bodies available. The diagram shows the body hierarchy and the most important members | ||
| + | |||
| + | |||
| + | [[File:body.png | center | 800px | thumb | Fig. 3: Body hierarchy]] | ||
| + | |||
| + | '''SimpleBody''': Just a simple Body with no External or internal Sensors, and no Actuators. | ||
| − | + | '''MeatBody''': Basically the same as SimpleBody, but implements a flesh and has a weight. Entities with a MeatBody can be consumed by e.g. an ARSIN. | |
| − | + | '''ComplexBody''': A sophisticated body that implements internal and external IO's, a biological system and a brain. | |
Latest revision as of 16:11, 29 January 2015
Simulation setup and organisation
The starting point of a simulation is the scenario file. Each simulation scenario is defined by such a file, which is basically a list of all properties and entities that make up a particular scenario. When the Scenario Selector GUI is called, it scans all the available scenario files and gives a list with descriptions. The user can then select a scenario and start the simulation by clicking on Start Scenario. This calls the class SimulatorMain which takes care of the simulators graphical interface and calls clsMain to handle the non graphical simulator background.
SimulatorMain and clsMain both extend modules of the MASON multiagent simulation toolkit that provides the simulation framework. The central module that MASON supplies is the scheduler. Before starting the simulation, the scheduler invokes a start procedure in clsMain which is configured to call clsSimplePropertyLoader to manage the scenario setup (create all entities decision units etc. and apply properties according to the scenario file). Everytime a entity is created, it is registered at the scheduler. Once the simulation is running, the scheduler calls 4 procedures (one after another for all registered objects) for each simulation step. The following diagram shows the principle
clsSimplePropertyLoader
This class sets up the simulation according to the selected scenario file. Most important, it manages the creation of the memory(s), decision unit(s) and entities. This process happens in 3 steps. If the entity that is to be created is a ARSIN, than it creates a instance of the memory (clsSearchSpaceManager and clsLongTermMemoryHandler), otherwise this step is skipped. Then a decision unit (which one is defined by the scenario file) is created and for the case ARSIN the memory handlers are passed to the DU. Last the entity is created and if needed the DU is passed to it. When a entity is created, it is registered at the scheduler. The following diagram shows the simplified principle (in reality the creation and registration is performed via factories)
Entities
The entities that are currently available in the ARS simulator are
| clsApple | clsAppleGreen | clsBase | clsCake | clsCan |
| clsCarrot | clsFungus | clsFungusEater | clsHare | clsLamp |
| clsLynx | clsPlant | clsRectangleStationary | clsRemoteBot | clsRemoteBotOrientationTest |
| clsSchnitzel | clsSchnitzl | clsSelf | clsSmartExcrement | clsSprout |
| clsSpeech | clsStone | clsToilet | clsTomato | clsUnrealHealth |
| clsUraniumOre | clsWallAxisAlign | clsWallHorizontal | clsWallVertical |
For further information see Entity Hierarchy. In order to interact with the simulator and the other simulated objects, every entity has a body (implemented via a member clsBaseBody).
Body
There are three types of bodies available. The diagram shows the body hierarchy and the most important members
SimpleBody: Just a simple Body with no External or internal Sensors, and no Actuators.
MeatBody: Basically the same as SimpleBody, but implements a flesh and has a weight. Entities with a MeatBody can be consumed by e.g. an ARSIN.
ComplexBody: A sophisticated body that implements internal and external IO's, a biological system and a brain.


